VPMAX Draw StrawTM1 Instructions
Safety first. Be wary of using any
tools or appliances that could cause sparks, heat or flame when working around
or near fuel. Use eye protection when working underneath truck. Be sure the
ignition is off and secure vehicle from rolling while working on, in or around
the vehicle. Do not attempt to start or run engine while someone is near the
engine compartment or under vehicle. Fuel tank should be empty before removal.
Handle fuel in accordance with all regulations.
Disconnect
the filler neck tubes from the rubber hoses coming from tank. Place blocks or
some means of support under tank on each end and remove tank straps. Lower tank
and remove the electrical harness, fuel supply and return lines from top of
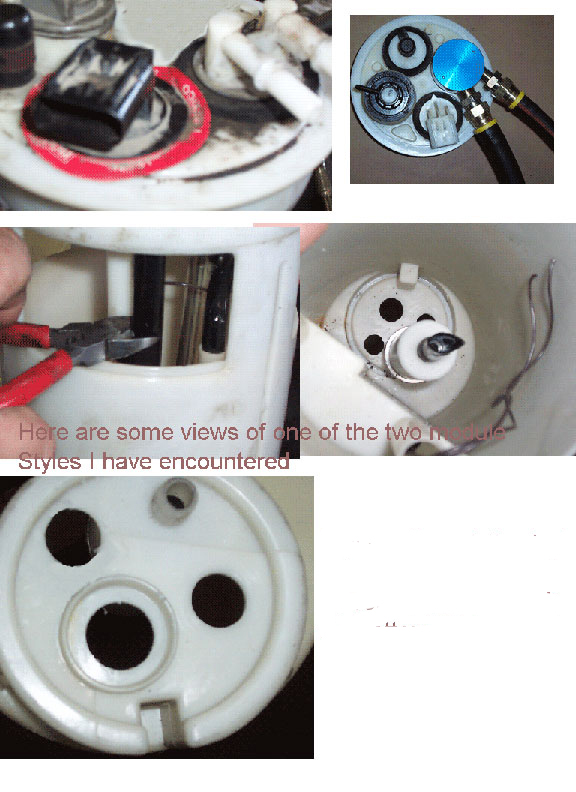
tank. Clean off the top of tank around the area of the tank module and the top
of the module itself so contaminants to not get inside the tank. Mark the
position of the module on the tank so it can be replaced in the same
position. Remove the module by
unscrewing the plastic ring. These can be difficult and may require the use a
hammer and block of wood to knock the ring loose and possibly two persons doing
this from either side. Be careful not to hit too hard as it is plastic and
could crack. Once removed pull the module out of the tank and drain any fuel
into a container. Clip the supply and return tube. Remove the fuel supply/return fitting from the
module. You can pry up on the edges and pull put from the rubber grommet, clip
the line that was formerly the draw tube with a pair of cutters (see pictures).
Split the module halves (upper and
lower), some units have screws and some snap off. Remove filter screen unit
from the bottom of module. On some units this is done from the inside by
pulling out the old draw tube then removing the screen, on others remove the screen
from the bottom. Only the top screen is to be removed permanently. Cut out the
top screen but leave the plastic ring in place. Using a step drill, drill a hole
in the bottom of the module so the draw tube can go down inside the filter
area, drill additional holes on either side for return flow. Drill three 3/8"
holes around the circumference of the module about 3 in. from the bottom of the
module.
Clean out any chips from the drilling and
be sure the screen is clean and in good shape.
Place the module back in the tank,
remove the rubber grommet and place the Draw
Straw TM
unit into the module and measure how much length to trim off the tube,
cut the new draw tube at an angle so it will have unobstructed suction. Tube
should be at the bottom. Install the fittings of your choice into the Draw Straw1 fitting and tighten. Use
diesel compatible sealant on pipe threads as needed. Be careful not to run your
tank too low after performing this modification.
Attach your fuel supply line to the
outlet fitting and your return line to the return fitting. Move tank into
position and elevate using supports and reconnect the wire harness. Be sure the filler hoses are clear over the
frame, raise tank, support and reinstall the tank straps. Reconnect supply and
return connections. Place fuel in tank, prime, start and check for leaks. If a
leak is discovered shut off engine locate and repair before proceeding.
Note:
Use of an inline external pre-screen
filter is recommended.
Use of hose clamps with push lock type fittings
may cause damage to hose.
Hose
installation: Warm up hose with a heat gun or hot
water, lubricate fitting barbs with soapy water or WD40 then using a solid surface push hose onto
fitting. Performance Supply Co. 2015